How to integrate Zoom with your Dryfta event platform?

Things you can do with our Zoom integration:


Using Dryfta + Zoom integration, event organizers can do the following:

  • Create meetings & webinars from within your Dryfta platform
  • Associate webinars and meetings with sessions and breakouts
  • Enable meeting and webinar recordings while creating sessions
  • Save participants’ check-in & check-out time & export into spreadsheet

Installation:

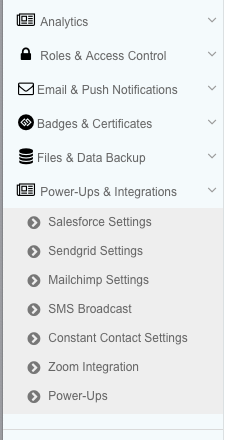
Go to Power Ups & Integrations > Zoom Settings under your Dryfta platform.

Zoom Webinar


Click on “Connect your Zoom account” button to connect your Zoom Account.

Connect to Zoom


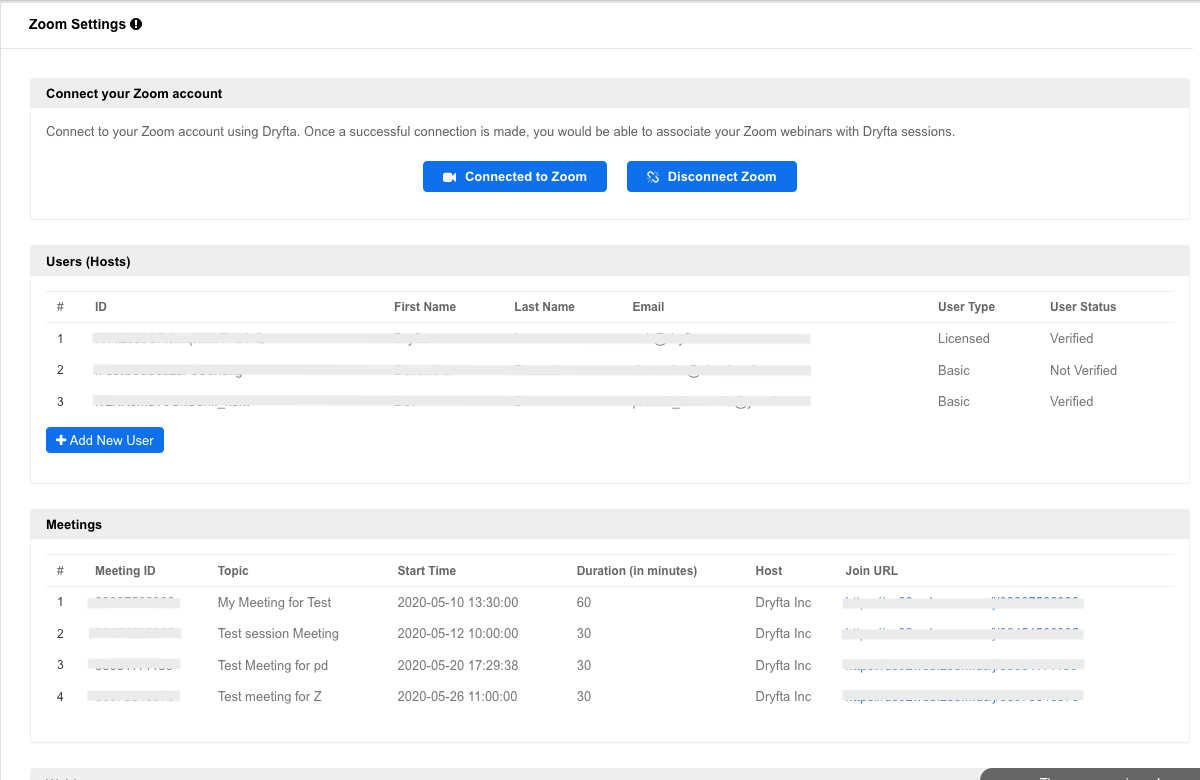
On the next page, click on Authorize to authorize your Zoom account to connect with your Dryfta platform. Once connected, you should see your meetings, webinars and alternative hosts you have already created.


Connected Zoom Account


Usage:


Adding alternative hosts

Each session requires at least one host to be able to start and end the webinar. If you’re hosting parallel sessions (when two sessions happen at the same time), you need to have a Zoom account with multiple hosts. There’re can be as many co-hosts but to start/end the webinar, one needs to have a host.

However, if you have no parallel sessions during the event, you do not require multiple hosts in your Zoom account.

We’re using the permission “View users information and manage users” to create alternative hosts from within your Dryfta platform. Once hosts are created, you would be able to assign them to their respective sessions.


Adding an existing webinar to a session

Your existing webinars and meetings you have created in your Zoom account are listed under Zoom Settings in your Dryfta platform.

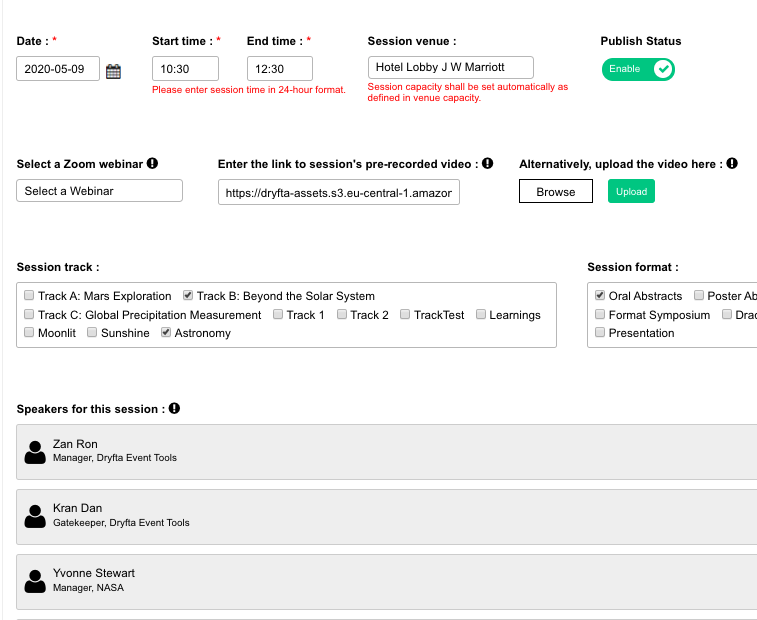
Go to Program Schedule > Program Builder to Edit a session and add an existing webinar/meeting to it. In session editor, select a webinar or a meeting to associate with this session. Once selected, click Save on the top right corner.

We’re using the permissions ” View all user Webinars”, ” View all user Meetings” and ” View all user information” to list webinars and meetings in your Dryfta platform, to authorize registrants for the webinar associated with the session and to add checked-in attendees to the list of registrants in your Zoom account.


Creating a new webinar + Automated recording

If you have existing webinar to associate with a session, you can create a new webinar or a meeting right from within the session editor. Under “Select a webinar” dropdown, choose “Create a new webinar” from the options.

On selecting this option, system would also ask you whether you would like to enable recording for this webinar. Enable it to yes if you would like the recording to be started as soon as the webinar begins.

The webinar is created once you click on the Save button. Dryfta would create the webinar based on the following information:

  1. Session’s date
  2. Session start time/end time
  3. System’s time zone
  4. Recording status: Enabled/Disabled
  5. Alternative hosts

We’re using the permission ” View & manage all user Webinars” and ” View & manage all user Meetings” to create new webinars and meetings.

virtual-session-editor


Adding sessions to personal agenda

Attendees can add sessions to their personal agenda and can access them from their dashboard on the website and the apps.

An email reminder is sent 7 days, 3 days, 1 day and 1 hour before the session begins. The email includes the name of the session, date and time along with a Check-in button. Clicking on the Check-in button would take the participant to the session’s page.


Joining a session as an attendee

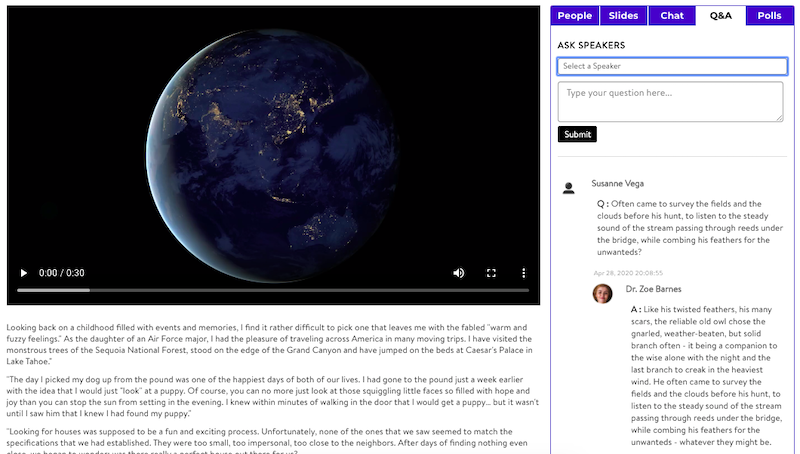
If the user is authorized to join the session, they would see the Check-in button 5 minutes before the session begins. Participant would then click on the Check-in button to join the webinar and check-in time would be recorded.

When user leaves the webinar, that would be recorded as the Check out time. After the webinar concludes, participants’ attendance information is automatically displayed in Dryfta.

video-monetization


Uninstallation:

You can disconnect your Zoom account by clicking on the Disconnect button under Zoom Settings in your Dryfta platform.

Alternatively, you can also uninstall the same from Zoom Marketplace > Installed Apps and clicking on the Uninstall button.


Troubleshooting :

1. Please ensure that you’re on a Webinar plan.

2. If you are planning to conduct parallel sessions, you need to have multiple hosts in your plan. Or else, you would not be able to host multiple sessions at the same date & time.

3. Each session requires at least one host. If you’re hosting multiple parallel sessions, you need to have a Zoom account with multiple hosts. There’re can be as many co-hosts but to start/end the meeting, one needs to have a host. However, if you have no parallel sessions during the event, you do not require multiple hosts in your Zoom account.

4. Please note that if you have at least one session associated with a meeting or a webinar, those associations would be removed after you disconnect your Zoom account.


Contact Support :

Unable to find answers to your questions? Contact our support desk by clicking on the Submit Ticket button on the top right corner.

Support Desk Timings: Our Support Desk is available 24/7.

SLA: For tickets marked “urgent”, we reply and try to resolve within 30 minutes. All other tickets are resolved within 4 hours with first response within 30 minutes.

Click here to submit a ticket

Request a live training session via Zoom (up to 4 sessions of 1 hour each)

Send us a direct message on our Twitter handle

or simply send an email to support@dryfta.com

Phone Support

24/7 phone support (this is a paid add-on: see add-ons)

How to integrate Dryfta with Square payment gateway?

To integrate Dryfta with Square payment gateway, please follow the steps below:


Step 1: Go to https://developer.squareup.com/apps and login with your Square credentials

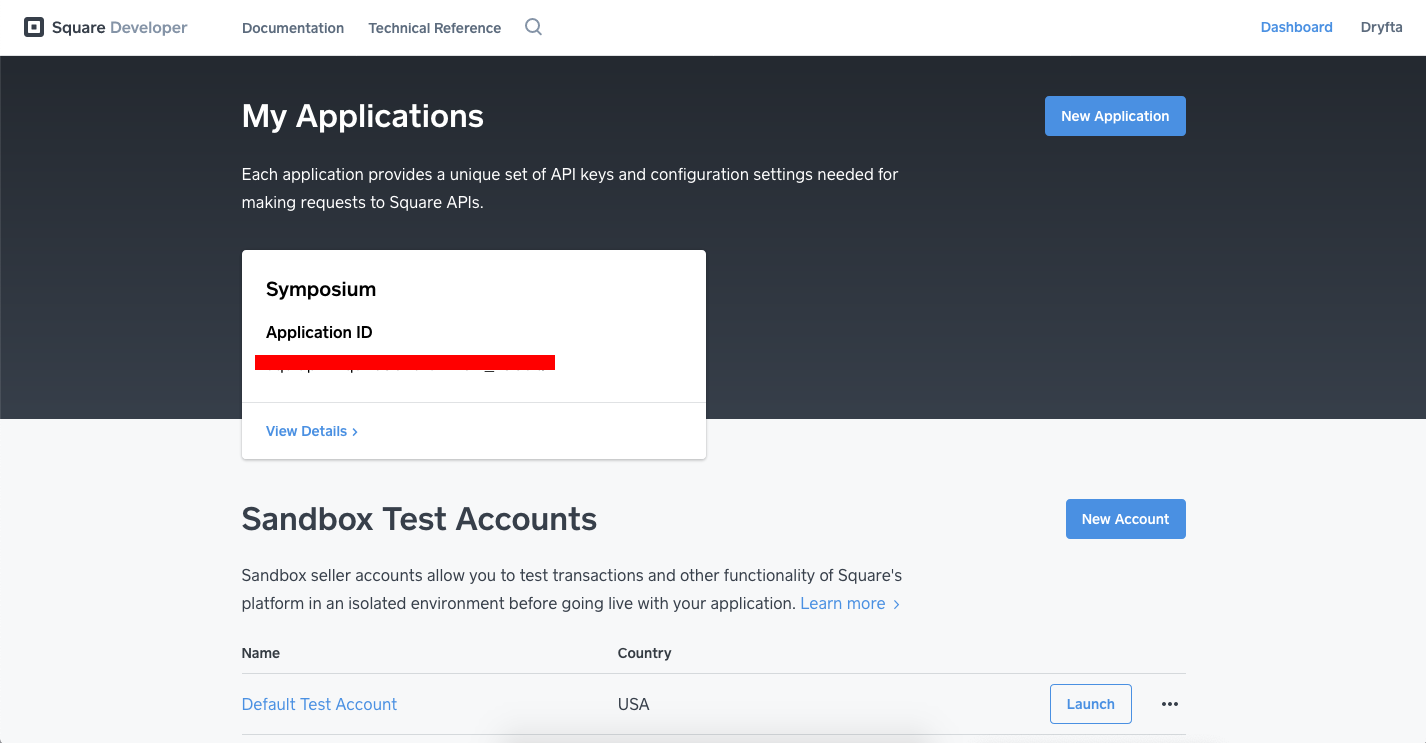
Step 2: Click on “View Details” button.


Step 3: Copy the “Personal Access Token” and “Application ID” (Please ensure that Production Settings is enabled in the bottom left corner) and Paste them in “Square Live Access Token” and “Square Application ID” fields respectively under your Dryfta payment settings (Tickets & Fees > Payment Setup) for Live payments.


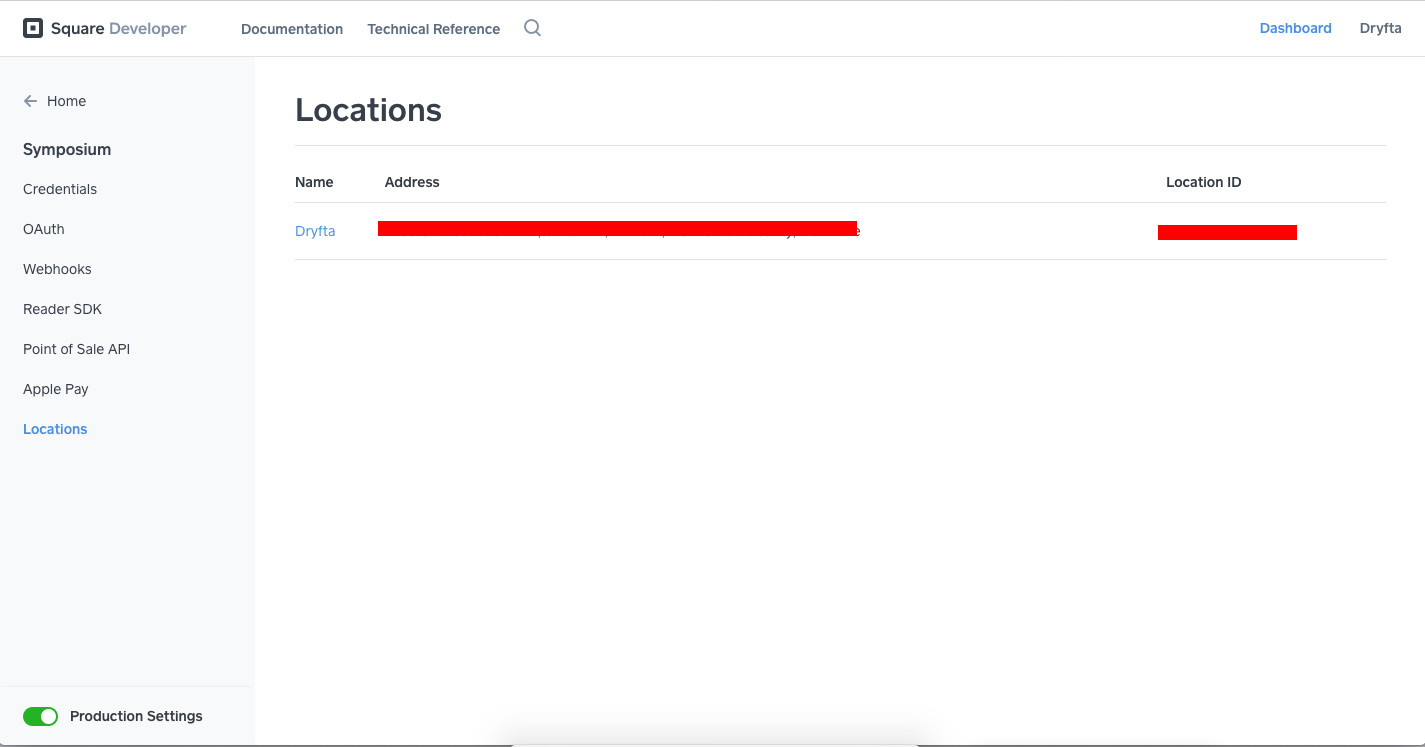
Step 4: Click on Locations in your Square Dashboard (you can find it in the left sidebar menu).


Step 5: Copy the “Location ID” and paste it in the “Square Location ID” field in your Dryfta payment settings for Live payments.


Step 6: Enable Square in your Dryfta payment settings. Click Save.


Test payments

If you wish to make test payments without using test cards, enable Sandbox Settings from the bottom left corner and follow the steps above. Do not forget to enable “Test mode” in your Dryfta payment settings.


You can use following test cards to make payments in test mode.

Test cards

BrandNumberCVVVerification Code
Visa4111 1111 1111 1111111
Visa EU4310 0000 0020 1019111123456
MasterCard5105 1051 0510 5100111
MasterCard EU5500 0000 0020 1016111123456
Discover6011 0000 0000 0004111
Discover EU6011 0000 0020 1016111123456
Diners Club3000 0000 0000 04111
JCB3569 9900 1009 5841111
American Express3400 000000 000091111
American Express EU3700 000002 010141111123456
China UnionPay6222 9888 1234 0000123

Notes:

  • You can set the card expiration date to any future month and year.

  • Payments in USD (United States), CAD (Canada), or GBP (United Kingdom) also require a valid postal code.

  • When testing the SCA flow with one of the European Union test cards, the Verification Code simulates the SMS verification code sent to the buyer mobile phone during an actual transaction.

How to import sessions and sub-sessions into program schedule?

If you’re importing accepted abstracts into Program schedule, Dryfta would automatically populate the session title, description and presenting speakers using the abstract IDs. You just need to add time slots and venues in the import file.

Here’s how to import program schedule:

Go to Import Program Schedule > Import sessions tab and download the sample file. Open the downloaded file and arrange it with track (optional), venue (optional) and time slots.  Then, go to Import Program Schedule > Import sessions tab and import your updated sample file (make sure it is saved in CSV format).

Sessions have sub-sessions as well?

Once sessions are imported, go to Import Program Schedule > Import sub-sessions tab and download the sample file. In this sample file, simply enter the abstract IDs in each sub-session column and then upload by clicking on the Import button. By default, there’re columns for adding up to 3 sub-sessions. f you want to add more sub-sessions, simply copy the columns associated with a sub-session and enter your abstract ID.

Notes:

  • The sample file includes all of your accepted abstracts and their IDs. If you want to display these abstracts as sub-sessions i.e. within a session, then remove the abstract IDs and description from the abstract ID and description columns respectively. Otherwise, it would overwrite your session titles with abstract titles fetched from the respective abstract IDs.
  • In Speaker column, add speaker IDs exactly how they are added in the sample file. Do not add their names. The sample file automatically generates the abstract IDs and the speaker IDs. You do not need to add speaker IDs manually.
  • Make sure the clock format is same for all sessions. For example, if you were using 12-hour clock format for one session and for another you were using 24-hour clock format, this would cause the system to have different clock format for different sessions. In other words, be consistent.
  • Date and Time slots columns are mandatory.
  • You can choose to ignore the tracks and formats columns.
  • Sessions have different color bars. These are used to differentiate sessions of a particular track.

How to create an email segment of accepted authors?

To create a segment of Accepted authors, do the following:
Select a usertype first i.e. Authors from under “Usertype” section.
From under “Columns” section, select User ID, First Name, Last Name, Email
Email segment
From under “Fixed fields from Abstract Management :” section, select Abstract ID, Title
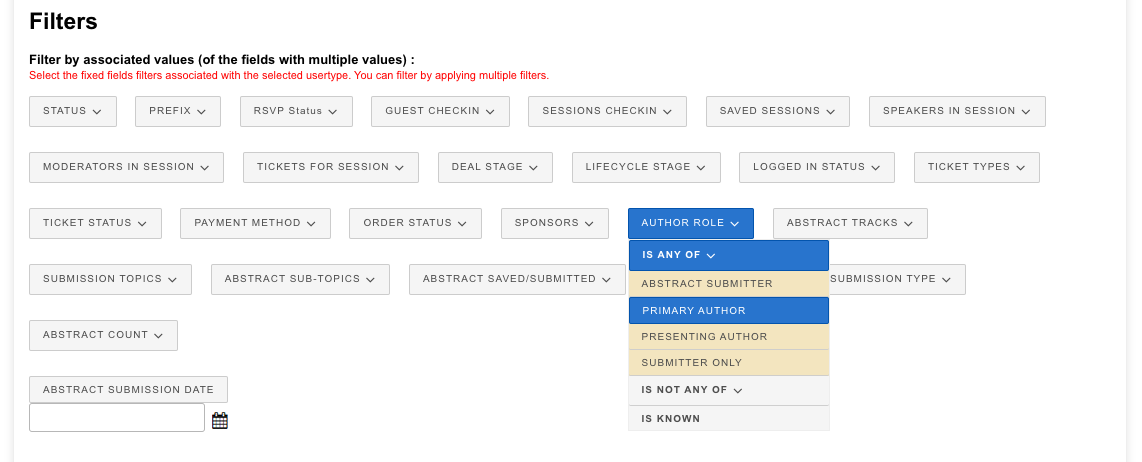
From under “Filters” section, Apply filter for Abstract Status (to Accepted) and Author role if you only want this mail to be sent to the Primary author of the abstract or both Primary and Presenting authors
If you only want to include abstracts from a specific submission type, Select the Submission Type filter as well and select the desired submission type (comes up when you select Is Any Of).
Email segment
Click save.

How to enable open review and discussion on assigned abstracts?

One can enable open review so all reviewers can see the reviews submitted on an abstract.

One can also enable open discussion among reviewers so they can discuss the abstract before submitting their reviews.

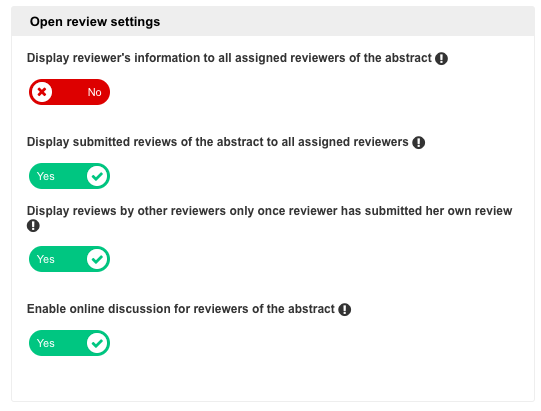
Go to Abstract settings and enable the following settings as per what you need:

Goal: all reviewers to be able to see all reviews for their assigned abstracts
Enable this setting: Display submitted reviews of the abstract to all assigned reviewers
Goal: all reviewers to be able to participate in discussion for their assigned abstracts
Enable this setting: Enable online discussion for reviewers of the abstract
Goal: reviewers not to see each others’ names when viewing the reviewers or participating in discussion
Disable this setting: Display reviewer’s information to all assigned reviewers of the abstract
Open review settings

How to use Acceptance letter builder to send acceptance letter to all accepted authors?

With acceptance letter builder, you can build and customize the acceptance letter PDF. Once customized, you can click on Generate Acceptance Letter button to generate a PDF copy of an accepted abstract to see how it looks like.

Then click on Send Acceptance Letter button in the top right corner. This would take you to the Email campaign page where you can create an email, sort of a cover letter, to be sent along with the acceptance letter PDF.

Before sending the campaign, you can send a test mail to yourself.

When ready, simply click on Send Email button in the top right corner to send the acceptance letter and PDF to all accepted authors.