Credit card payments are not going through when using Authorize.net. What could be the reason?

You need to make sure the correct login credentials are entered and that permissions to accept payments are activated for this login.

Also, Authorize.net also has merchant-specific condition according to which if a merchant’s business location is based out of Australia, only then they would be able to accept payments in AUD.

Authorize.Net can accept transactions from merchants located in the United States, Canada, United Kingdom, Europe or Australia, in multiple currencies.

For more details, please see the table below. Currencies are listed using the ISO 4217 alpha-3 standard, for three-letter currency codes.

Business LocationSupported CurrenciesWebsite 
United States, CanadaUSD, CADhttp://www.authorize.net/
United Kingdom, EuropeCHF, DKK, EUR, GBP, NOK, PLN, SEK, USDhttp://www.authorize.net/en-GB/
AustraliaAUD, NZD, USDhttp://www.authorize.net/en-ANZ/
OtherSee http://www.authorize.net/international/ for other currency options.


So, please confirm your business location and make sure it’s an address in Australia if you wish to support AUD. If the issue persists, then we will report this as a bug and take immediate action.

How to get PayPal Payments Pro API Username, Password and Signature information?

If you have a PayPal Payments Pro merchant account and want to accept credit card payments on your Dryfta event website without redirecting users to the PayPal website, then you need to enter the credentials for API Username, Password and Signature under Basics > Payment Settings.

Here are the steps to find your PayPal Payments Pro credentials:

  1. Log in to your PayPal Business account.
  2. Click Profile tab located in the top navigation area.
  3. Click API Access link under the Account Information header.
  4. Click Get Started link under the Request API Credentials heading.
  5. Click My selling preferences option in left sidebar.
  6. Click Update option for API access item.
  7. Complete the API Credential Request form by clicking the agreement checkbox and clicking Submit.
  8. You will now have the API username, password and signature.
  9. Copy the values from this page into Dryfta Basics > Payment Settings.
  10. Click on Save on top right to save the settings.
  11. Create a test ticket (enter a very small pricing like 0.01 USD)
  12. Purchase test tickets on the website as an attendee to confirm your payments are successful.

How do we accept payments for event registrations if we do not have our own merchant account?

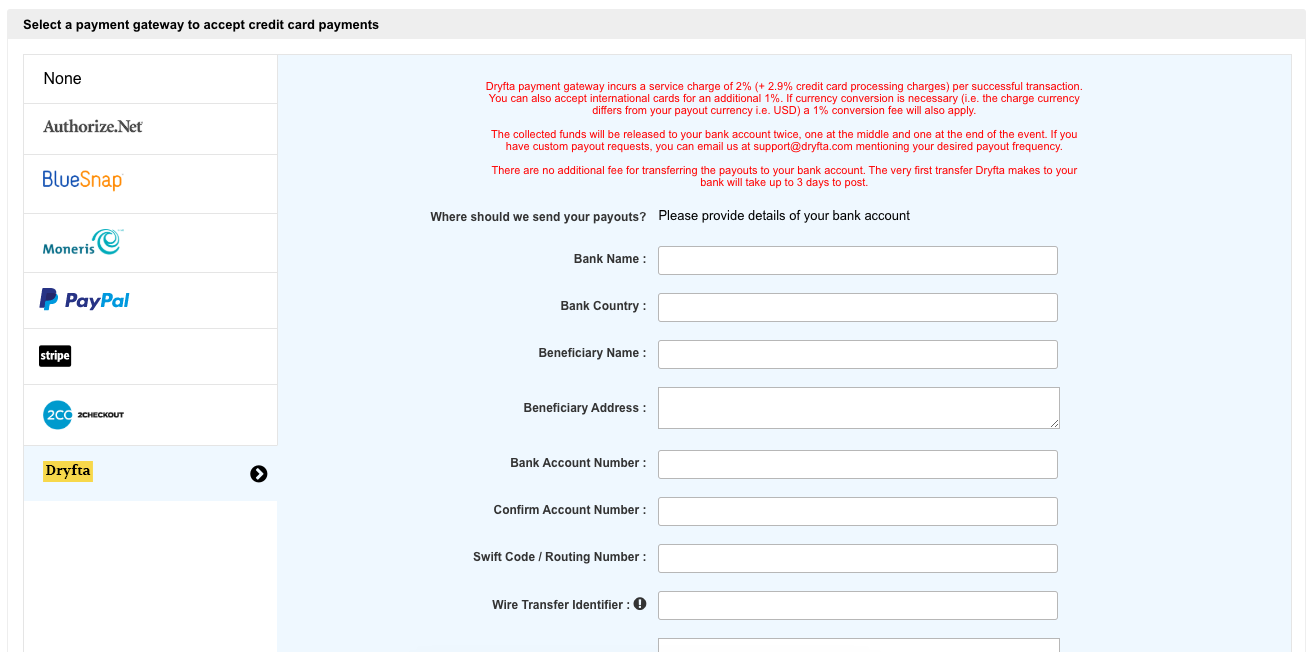
If you do not have a merchant account, you have the option to choose Dryfta payment gateway which accepts ticket payments on your behalf and transfer the funds through wire transfer.

To enter your bank information where you wish to receive the payouts, go to Tickets & Fees > Payment Setup and click on Dryfta logo under Credit card payments. Enter your bank information and click save.

payment settings


Payout frequency – Payout transfer is currently scheduled to be released twice during the event, one in the middle and one at the end of the event. You’ll be notified if a schedule change comes into effect.

Alternatively, you can choose to receive the payout at the end of every month. To set your payout frequency to monthly payouts, please send an email to support@dryfta.com

Transaction fee – There is a fee of 4.9% per transaction (service fee + credit card processing fee) if you use our in-built merchant account.

The system sends an email to the event’s main admin on every transaction (successful/failed/cancelled) that is made on your event website and is also recorded under Orders section in your event dashboard.

The transaction details include:

  • Customer name
  • unique order ID
  • Date of transaction
  • Payment method
  • Billing address
  • Transaction amount
  • Ticket which has been purchased
  • name of the ticket owner for whom this ticket was purchased
  • Total tax applied
  • Payment status (Confirmed/Pending)


You will have this information available in the email sent to you as well as under the Orders tab in event dashboard.